
Why did your email land in spam?
If your important emails are landing in spam, you are not alone. Many business owners who manage their own Google Workspace settings encounter this issue.
This often results from a technical setting that many business owners are unaware of. While your emails are legitimate, strict filters may not recognise them as such. The problem lies in your email setup, specifically the lack of verification.
In this post, we explain why this occurs and provide a proven, step-by-step solution.
Why This Keeps Happening
Email services use strict filters to prevent a large volume of spam.
If your Google Workspace account isn’t set up with SPF, DKIM, and DMARC, spam filters will become suspicious, and your emails might not reach your intended recipients, potentially leading to missed business opportunities. For example, you might send an invoice to a client or share an important proposal, only for it to land in their spam folder without either of you realising. This can create confusion, delay payments, or even damage your professional reputation.
These settings serve as a digital passport, confirming that emails from your address (such as you@yourbusiness.com) are genuinely from you. Without them, your messages may appear suspicious to spam filters.
How to Fix It (The Technical Bit)
Now, let’s address the technical steps.
If you are not familiar with technical setups, configuring Google Workspace can seem daunting. Errors can cause issues, so take your time and double-check each step before saving changes. If you are unsure or encounter difficulties, contact your domain provider’s support or consult an expert. It is better to verify than risk disrupting your email service.
If you are comfortable managing your website’s domain settings, the following guide will assist you.
Step 1: Set Up Your SPF Record
SPF (Sender Policy Framework) is the first step. This setting specifies that only Google is authorised to send email for your domain.
- Log in to your domain provider’s admin console. (This is where you bought your website domain, such as GoDaddy, Namecheap, 123-Reg, or similar.)
- Find the settings for ‘DNS Management’, ‘Zone Editor’, or ‘Advanced DNS’.
- Create a new TXT record.
- In the ‘Host’ or ‘Name’ field, you can usually put @ (or leave it blank, depending on your provider).
- In the ‘Value’ or ‘Points to’ field, paste this exactly: v=spf1 include:_spf.google.com ~all.
- Save your changes.
**Step 2: Set Up Your DKIM Record (DomainKeys Identified Mail) **
This process adds a unique digital signature to your emails, verifying that your message has not been altered, and involves several steps and requires switching between your Google Workspace Admin console and your domain provider.
Stage 1: Generate Your Key in Google Workspace
- Sign in to your Google Workspace Admin console.
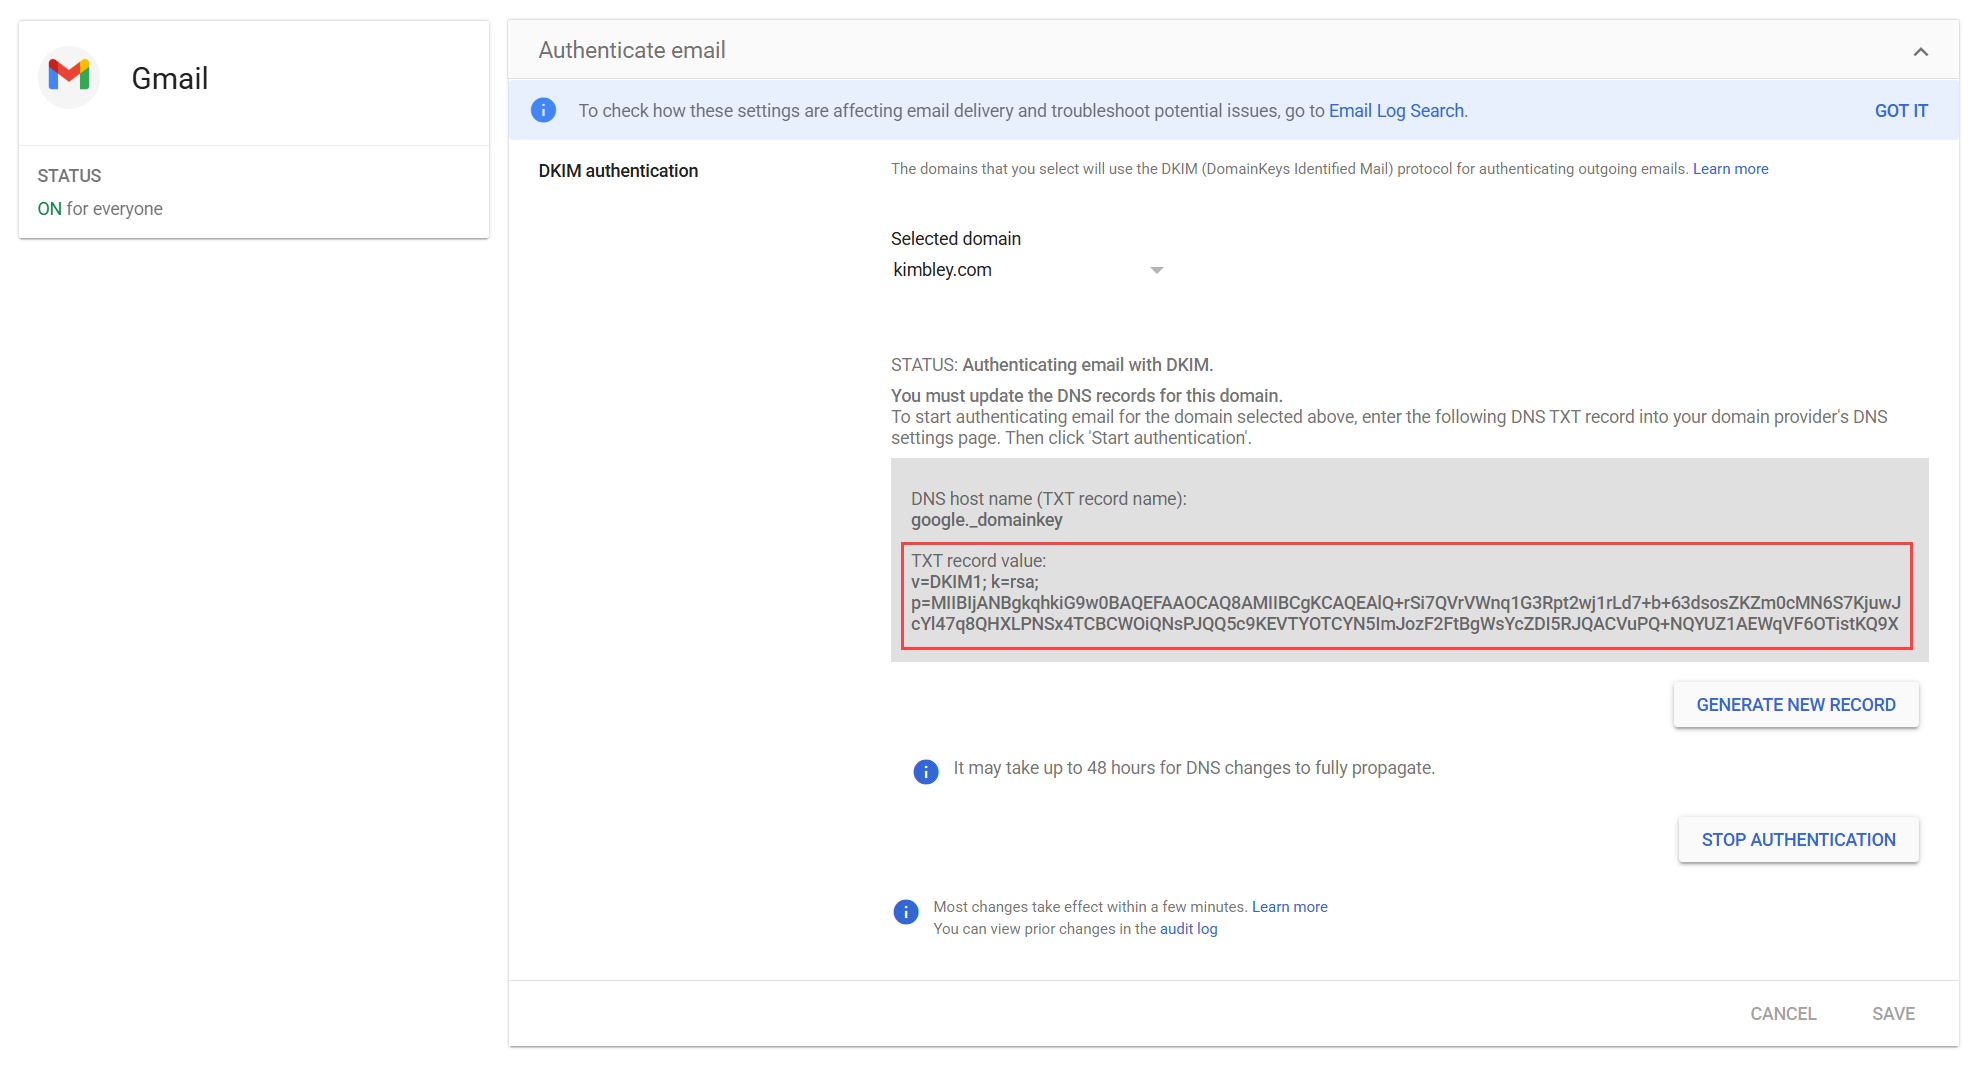
- Go to Apps > Google Workspace > Gmail > Authenticate email.
- Select your domain and click the ‘Generate new record’ button.
- A box will pop up. Copy the long text string in the ‘Value’ field (it starts with v=DKIM1; k=rsa; p=…).
Stage 2: Create the DNS Record
- Go back to your domain provider’s admin console (from Step 1).
- Create another new TXT record.
- In the ‘Host’ or ‘Name’ field, paste this exactly: google._domainkey
- In the ‘Value’ or ‘Points to’ field, paste the long text you copied from the Google Admin console.
- Save your changes.
Stage 3: Switch It On
- Allow time for the settings to update across the internet. Changes may take from a few minutes to several hours to take effect, so do not be concerned if they are not immediate.
- Go back to the same page in your Google Workspace Admin console.
- Click the ‘Start authentication’ button.
Step 3: Set Up Your DMARC Record
DMARC (Domain-based Message Authentication) is the final step. It builds on SPF and DKIM by instructing other email servers on how to handle messages that claim to be from your domain but fail authentication checks.
Important: Only do this after you have set up both SPF and DKIM, because this step depends on them.
- Go back to your domain provider’s admin console one last time.
- Create a new TXT record.
- In the ‘Host’ or ‘Name’ field, paste this exactly: _dmarc
- In the ‘Value’ or ‘Points to’ field, paste this: v=DMARC1; p=reject; rua=mailto:your_email@yourdomain.com
Ensure you replace your_email@yourdomain.com with your actual email address. This will allow you to receive reports on any emails that fail authentication.
This setting helps prevent fraudulent emails, such as phishing attempts that appear to originate from your company, from reaching recipients' inboxes.
How to Check If It’s Working
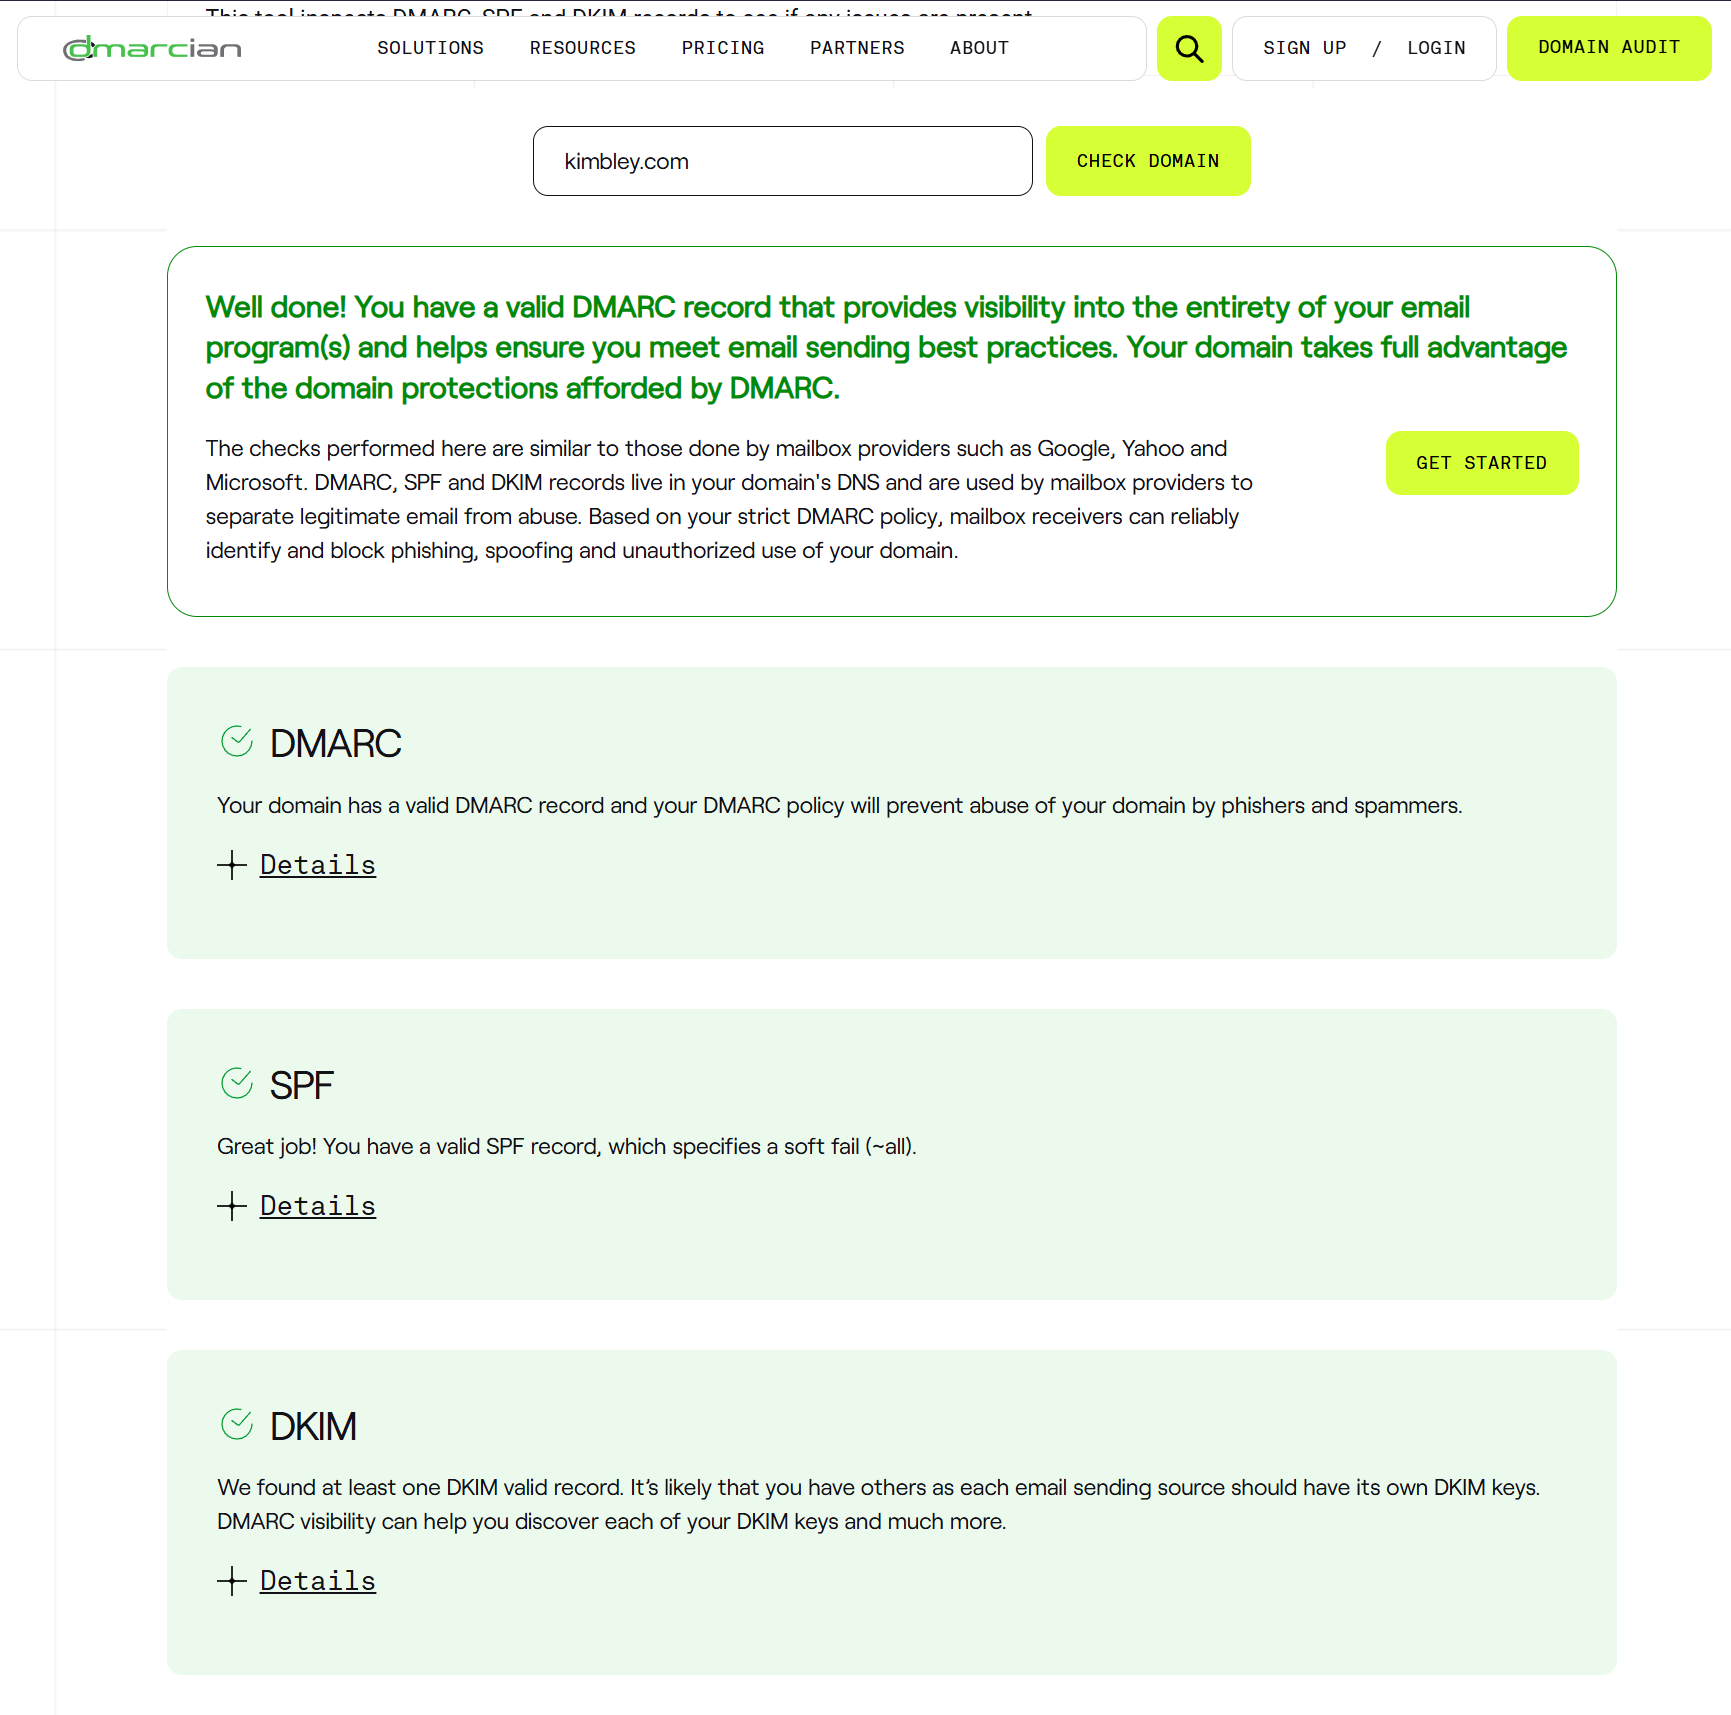
After completing these steps and allowing time for the settings to update, you can verify your configuration.
- Go to the ‘Kimbley IT Email Security Check Tool’.
- Type your domain name in the box and click ‘Run checks!’.
- The tool will generate a report and should display confirmation for your SPF, DKIM, and DMARC setup. If you encounter errors or warnings, review each value for accuracy and ensure the settings have had sufficient time to update. If issues persist, contact your domain provider’s support or consult an expert.
A Quick Reality Check
This setup ensures that your routine business emails, such as invoices, project communications, and client messages, are recognised as legitimate. However, this does not permit the sending of mass marketing emails without consequences. Sending large volumes of newsletters can still harm your domain’s reputation and cause messages to be marked as spam.
Tired of Just Reading About This?
This process is technical, and if you prefer not to handle it yourself, you are not alone. Configuring these settings correctly is essential, as errors can disrupt your email service entirely.
In our experience, missing this setting often indicates you are not fully utilising Google Workspace’s capabilities. You may have overlooked other important security settings and valuable features that enhance productivity, such as shared drives for collaboration, security alerts, or integrated calendar tools.
As a certified Google Workspace Partner, my team has the expertise to ensure your email setup is correct, help you maximise Google Workspace’s capabilities, and manage this process for you, saving you time and helping you avoid potential issues.
If you would like expert assistance, please book a video call with my team at Kimbley IT.